Windows 10 asks for a password when signing in. Disabling the password through "User Accounts"
When you turn on the computer, as a rule, it asks you to enter an access code. Protecting your account with a password is designed to prevent access to your confidential information for other users. However, if you are sole user personal computer, constantly asking for a password when logging in will be more of a hindrance than a help.
These are unnecessary actions, unnecessary information that needs to be remembered, an increase in boot time when turning on the PC, and so on. In addition, if you forget it, you will get a lot of problems.
Therefore, it is easier for most users remove password entry for your account in Windows 10. This article is devoted to this issue.
Disabling a password for a local account
If you use a local account to log in to Windows 10, cancel password entry simple enough. You can simply remove it.
To do this, do the following:
- Call the menu " Start”, using the Win key, or using the corresponding icon on the Quick Access Toolbar.
- Open " Options". You can also invoke this interface with the keyboard shortcut Win + I .
- Go to the section called "".
- Use the navigation menu on the left side of the window to navigate to the " Login Options».
- In the column " Password» click the Change button.

- Enter the current access code for your account.

- Leave all fields blank and click Next to remove the check.

- If the OS asks you to reboot, do it.
current the password will be deleted immediately and will not be required to enter the Windows 10 operating system the next time you turn on your personal computer.
Alternative way to disable the request
If you don't like the settings menu that was introduced in Windows 10, you can remove the passcode using the familiar control panels. The tool is also used for this Change».
Do the following:
- Click on the button " Search» on the Quick Access Toolbar.
- Enter« control Panel" fully or partially.
- Run found utility.

- Go to category "".

- Click on the hyperlink " Deleting User Accounts».

- Choose your account from the list provided.
- Click on the hyperlink " Change password».

- Enter a valid password, the rest of the fields should be leave blank.
- Click " Change password» to save the settings.

As in the previous method, the password will be removed and you will not need to enter it the next time you sign in to Windows 10.
Disable prompt for Microsoft account
The above methods allow you to get rid of the password check at login, but only when you work with local account. However, Windows 10 allows you to log in to the system using unified Microsoft account. And it is no longer possible to remove the password in it. However, you can set the login information to be entered automatically when you start this personal computer. This can be done in two different ways.
Account settings
The first way to remove the check is more simple. However, unfortunately, does not work on all computers. It is highly recommended that you try it first. And in case of failure, go to the next point. To set up automatic entry without prompting, follow the instructions provided:

In most cases, this is enough to log into the OS without asking for a password. However, if you are unable to remove the check, you will need to manually editing the registry.
Registry changes
The registry stores data that Windows 10 uses to operate. By modifying existing entries and creating new entries, users can seriously change how the operating system works. Therefore, all changes should be made very carefully, since any mistake can lead to incorrect operation of the computer.
Before starting work in the registry editor, it is strongly recommended to make a system restore point. If something goes wrong, you can easily rollback to a saved version of Windows 10 without having to reinstall.

Registry Editor
To enter the editor, users will need to do the following:
- Call the dialog " Run' using Win + R .
- Type regedit and click OK.

- If the program requires administrator permission, click OK.
- The directory tree is located on the left side of the editor. Use it to find the directory HKEY_LOCAL_MACHINE\Software\Microsoft\Windows NT\CurrentVersion\Winlogon
Romanov Stanislav 10.01.2019 1689560
How to remove the password when logging in to Windows 10?
Want to quickly boot into your Windows 10 desktop while skipping the login screen? Want to avoid entering your account password every time you turn on your computer? You can easily disable your password at sign-in and set Windows 10 to automatically boot to your desktop or start screen without entering it.
The main advantage when logging in without a password is that the account does not require you to enter it, which means that you do not need to remember it and spend a few seconds during loading. That is, it will launch the desktop a couple of seconds faster. But, on the other hand, remember that it is much easier to access a PC without a password (for example, for children).

The procedure for setting up automatic login in Windows 10 is very similar to the same operations in Windows 7 and Windows 8. Therefore, some of the screenshots were taken in Windows 8.1. This method applies to both a local account and a Microsoft account. In other words, you can use this instruction, regardless of the type of account.
Warning: Only enable auto login if you are the only PC user. If the computer is used by other people (and children), then it is best to keep the accounts under lock and key.
You can follow one of the methods below to enable automatic login to Windows 10 without entering a password.
Method #1 to automatically login without entering a password
This is the easiest way to remove the password from the Windows 10 login screen.
Step 1: Open the Run window by pressing Win+R (Windows logo key and R key) at the same time. In the dialog box, type Netplwiz and then press enter.

Step 2: This will bring up a dialog box with "Accounts", select a user account, and then uncheck the "Require username and password" option. Click the "Apply" button, then the "Auto Login" window will open.

Step 3: In the automatic login dialog, enter the password, enter it again to confirm, and click "OK".

Step 4: Make sure the checkmark is cleared. You can try rebooting the system to check the effect.

Method number 2 to remove the password through the registry
If, for some reason, you are unable to set up automatic login to Windows 10 by following the above method, please use this one.
Step 1: Open Registry Editor. To do this, open the Run window (using the Win+R keyboard shortcut), type Regedit in the available field, and then press enter. Click the "Yes" button if a new window appears in front of you asking you to make changes to the system.

Step 2: In the Registry Editor, go to the following section:
HKEY_LOCAL_MACHINE\SOFTWARE\Microsoft\Windows NT\CurrentVersion\Winlogon

Step 3: On the right side of the editor, find the setting called DefaultUserName, double-click on it, and make sure your Microsoft account or local user account name is mentioned in the Value field.

Step 4: Next, again in the same part of the window, find the DefaultPassword parameter. If the entry does not exist, create it by right-clicking on an empty space, clicking the New button, and then clicking on String Value. Rename it to DefaultPassword and enter the password in the Value field. Click OK.

Step 5 A: Finally, you need to enable automatic login. To do this, in the same part of the editor, find the entry labeled AutoAdminLogon, and then change its value from "0" (zero) to "1" (one).
While continuing to unravel the mysteries of the Windows 10 operating system, I came to know about the following user problem. Some people cannot remove the password that asks us operating system Windows 10 every time you sign in or wake up from sleep. Having figured it out a little, I decided to write this article and explain to my readers what's what.
And so, in the Windows 10 operating system, there can be two accounts: either a local account or a Microsoft account. If you have a local one, then you can safely start disabling the password now, if Microsoft, then first it will need to be transferred to the local one, and only then disabled. If you don’t understand what I’m talking about at all, then read the article, and only then proceed to practice.
Local account- this is your personally invented login and password, they are used when logging into the system.
Microsoft account- this is your registration data on the Microsoft website, where the postal address is used as a login.
In the list of accounts
And so we begin. Press the key combination Win + R and in the window that opens, write netplwiz, click "OK"
In the window that opens, in the "Users" tab, remove the bird in front of the item "Require username and password". Click "OK"


In theory, this should be enough, but just in case, we go further. Click the "Start" button and select "Settings"

In the window that opens, click on the tab "Accounts"


If this is not the case for you, then disconnect your account from Microsoft by clicking on the "Disconnect" button. In the window for switching to local, you enter your password and username. Next click "Log out", after all this, the system will be transferred to a local account.
Via login options
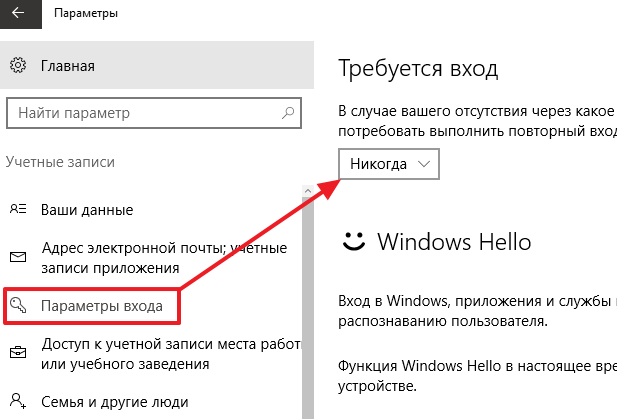
We remove the password in the section "Login Options". They write to us here that in the event of our absence, the system should request a re-entry after a while. Next to this item, select the value "Never" from the drop-down list (this means that the operating system will no longer ask us for a password when exiting sleep mode). And near the item "Password" click on the button "Change".

Enter your current password and click on the button "Next":

In the next window, we leave all the fields empty, and this means that now we will not have any password at all:

So it is, we are in the section "Login Options" now they write that our account does not have a password.

This could have ended, although there is another way to disable the password through the registry, but I do not recommend using it, because you can create the wrong parameters and values and cause trouble.
And also watch a video on the topic:
Rate article:
There are issues regarding disabling the login password. operating room Windows system 10 requires you to enter your Microsoft account password every time you turn on your computer and log in, which is quite annoying for users. Especially if the password is quite complex and the user cannot enter it from memory.
If you are also facing a similar problem, then this article should help you. Now you will learn how to disable the password when logging into Windows 10.
Step number 1. Run the "netplwiz" command.
In order to disable the password when logging into Windows 10, you need to run the “netplwiz” command. This can be done in several ways. For example, you can open the "Run" window by pressing the key combination Windows+R and enter the command "netplwiz".
You can also use the search. To do this, open the Start menu and search for "netplwiz". After that, the system will prompt you to execute this command.

Step number 2. Disable the password when logging into Windows 10.
After executing the “netplwiz” command, a window called “User Accounts” or “User Accounts” should appear on the screen if you have an English version of Windows 10. In this window, you need to disable the “Require username and password” function and click on the button “ Ok."

Step number 3. We confirm the password is disabled.
After clicking on the “Ok” button, the operating system will require confirmation by entering a password. Enter the current password twice and click the OK button again.

On this, disabling the password at the entrance can be considered completed. Now, when you turn on the computer, the system will not require you to enter a password. But, the password will be required when exiting sleep mode. To disable the passcode when waking from sleep mode, follow step #4.
Step number 4. Disable the password when exiting sleep mode.
If you have Windows 10 without updates, then in order to disable the password when exiting sleep mode, you need to right-click on the "Start" button and select "Power Management".
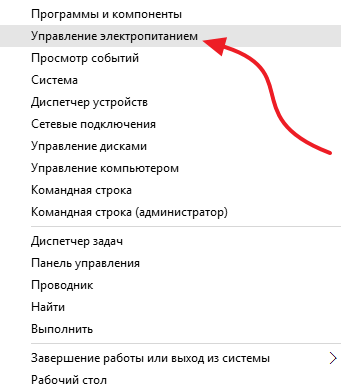
You can also open the Power Management window by searching the Start menu. To do this, enter the search query "Power".

In the power management window, go to the "Require password on wakeup" section. The link to this section of settings is in the left side menu. If you don't have a "Require a password on wakeup" section, then you may have a "Power button action" section where the same settings are available.


After that, you need to enable the "Do not ask for a password" function and save the settings by clicking on the "Save changes" button.

After these simple manipulations, the password when entering Windows 10 will be completely disabled. Now the operating system will not require you to enter a password after turning on or waking up from sleep mode.
If you have the latest updates for Windows 10 installed, then you will not have the settings described above in the "Power Options" section. In your case, you need to use the "Options" menu. To do this, open "START", go to "Settings" and find the section "Accounts - Login Options" there. In this section, there will be an option called Login Required, you need to set it to Never. After that, the system will disable the password when logging into Windows 10.
If you have "Windows 10 Professional" or "Windows 10 Enterprise", then you can also use the Group Policy Editor. To do this, run the "gpedit.msc" command and in the window that appears, go to the "Computer Configuration - Administrative Templates - System - Power Management - Sleep Settings" section. In this section, you need to disable two functions related to the password request when exiting sleep mode (noted in the screenshot below).

Again, the Group Policy Editor (gpedit.msc) is only available for Windows 10 Professional or Windows 10 Enterprise. If you have Windows 10 Home, then you can turn off the password prompt when waking up from sleep mode only through the Options menu.
Everywhere you look in Windows 10, passwords, passwords, passwords are everywhere... What is the saddest thing is that they are tied not only to but also to Microsoft registration data. Naturally, this causes a lot of problems or complaints from Windows 10 users. However, you can turn off the password request. To do this, even the system itself offers several simple methods.
How to turn off the password prompt on startup in Windows 10: standard method
As you know, man is not a machine. He cannot remember too much information. The same applies to passwords, because even when registering (creating a Microsoft account), the official resource refuses to accept primitive combinations at all. Therefore, you have to come up with abstruse passwords, and they are very easy to forget.
To avoid such incidents in the future, consider how to turn off the password request at login. Windows 10 allows you to do this through special settings that can be accessed by entering the netplwiz command in the Run console.
There are two main conditions to be noted here. Firstly, initially the login must be done under the administrator, which is the case on most computers. Secondly, it is recommended to change these parameters only if only one user works at the terminal (roughly speaking, if the computer is intended exclusively for home use).

So, in Windows 10, you can disable the login password request in the above settings by selecting the desired username from the list and unchecking the password requirement line. When confirming the changes, a new window will appear in which you will need to enter the existing password, and then confirm it. After that, the so-called automatic login mode will be activated.
Note: if in this moment computer system is joined to a domain, these settings will be inactive, and you will have to use the system registry to disable the password. But more on that later.
How to disable password prompt on Windows 10 wake up (wake up from hibernation)?
Another "chip" of the system is that by default it requires a password when exiting the so-called sleep state (hibernation), if it is enabled. For the most part, it is used by office workers who need to be away from time to time on business, and laptop owners who have the appropriate action set with the lid (when it is closed, the device automatically switches to
How to turn off the password request for this situation in Windows 10? There is nothing easier. To do this, you will need to use the settings of the current power scheme in the corresponding section of the standard "Control Panel". Notebook owners can use the right-click menu on the battery icon in the system tray to access settings.

First, select the scheme settings item, and then use the advanced options. Next, go to the section of inaccessible parameters, where we simply uncheck the box for requiring a password.
Disabling password entry through the system registry
In Windows 10, you can disable the password request through the editor system registry, which is called through the Run console by entering the regedit command.

Here you need to select the HKLM branch, and then go down to the Winlogon directory through the SOFTWARE section. In the window on the right, you should change the values of several keys:
- AutoAdminLogon - value "1";
- DefaultPassword - The account's current password.
You can also change the DefaultDomainName key to your desired domain name or computer name. Finally, the default user key DefaultUserName can be set to a different name, followed by the corresponding password.
Local accounts
There is another way to solve the problem of how to turn off the password prompt in Windows 10 when trying to log in. To do this, enter the settings section and use the account settings.

On the left, there is an entry for login options. On the right side of the window, from the re-entry request menu, simply select the "Never" value.
Finally, if using a local account, you should use activation command line from admin ( cmd command in the Run console or manually launching a file with the appropriate rights from the System32 folder). In the console window that appears, you need to write the line net users, and then use the command net user username /active:yes (the user name must be entered as it is registered in the system, for example Administrator or Administrator, depending on the language of the system itself) and press the key input.
Instead of total
It remains to be added that here are the simplest methods to disable the password in the tenth version of Windows. The fact is that similar operations can be performed both in the group policy editor and in the administration section. But they will simply duplicate the values of the system registry keys. In addition, if you make changes in the policies section, then you will not be able to change the values \u200b\u200bof system registry entries. Therefore, as the simplest and most affordable means, you can use everything that was described above, not to mention the removal of local registration data or even the Microsoft “account” itself.